Deep learning models are the brains behind everything from self-driving cars to customized shopping experiences in today’s technologically advanced world. But creating a fantastic model is just half the fight. These models need to be implemented in a way that makes them secure, scalable, and accessible if they are to have a significant impact. RESTful APIs are useful in this situation. We will delve into the realm of optimizing the deployment of deep learning models in this blog, examining how RESTful APIs can facilitate and streamline this process.
Overview
The Enchantment of Deploying Deep Learning Models
Let’s say you’ve recently developed a deep learning model that has exceptional accuracy in identifying objects in pictures. It’s the culmination of many coffee cups, late nights, and months of arduous labor.But now comes the big question: How do you take this model out of the lab and put it into the hands of users? This is where deployment enters the picture.
Deployment is like the grand unveiling of your model to the world. It’s the process of making your model accessible so that applications and users can interact with it, whether that’s predicting customer behavior, diagnosing diseases, or powering smart assistants.
Why RESTful APIs Are Your Best Friend
Now, imagine you’ve built this fantastic model, but every time someone wants to use it, they have to dig into the codebase, understand complex algorithms, and run it manually. Not exactly user-friendly, right? This is why RESTful APIs are a game-changer.
RESTful APIs (which is short for Representational State Transfer) enable you to encase your model with an easy-to-use interface. With a RESTful API, your model can be hiding behind a tidy little endpoint, ready to accept data, process it, and send back results—all across the web. It’s as if you’re providing your model with a clean, elegant entryway whereby users and applications can come and go without having to know the mess of inner workings.
Are you intrigued by the possibilities of AI? Let’s chat! We’d love to answer your questions and show you how AI can transform your industry. Contact Us
Section 1: Understanding Deep Learning Model Deployment
1.1 What is Model Deployment?
Let’s take it apart: model deployment is deploying your deep learning model out into the world. It’s the act of moving that model off your local box and getting it ready for real-time usage. But there’s more to it than clicking the “deploy” button.
Deployment is where it counts. It’s where your model comes face-to-face with the rawness of actual data, unknown traffic, and speed demands. Think of your model as a superstar player—its practiced winning every game but now has to deliver on game day. Deployment is the venue where your model needs to play under stress.
But like every large event, deployment is its own set of challenges:
Latency: Your model must be able to respond immediately. If the response is delayed, users will become frustrated or, worse still, abandon their attempts.
Scalability: What if 10,000 users need to run your model simultaneously? Your deployment plan must be able to accommodate that without flinching.
Maintenance: Models, as with everything else, must be updated. How do you do this without producing downtime or faults?
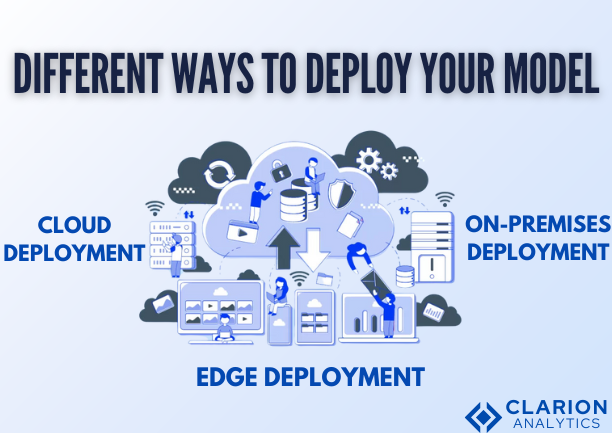
1.2 Different Ways to Deploy Your Model

Now, let’s discuss the various stages where you can put your model. Imagine it like selecting the right location for your star performer:
Cloud Deployment: Picture a gigantic stadium where your model gets to shine for the whole world to see. The cloud has an unlimited number of seats (scalability), top-of-the-line equipment (hardware accelerators), and the ability to scale up as necessary. It’s the VIP row of deployment—but at a cost and with privacy risks.
On-Premises Deployment: This is akin to having a private concert in a special club. You have control over the environment, the audience, and the performance. On-premises deployment is ideal for sensitive information or if you require tight control of everything. But it does mean you need to deal with the infrastructure, which can be tiresome.
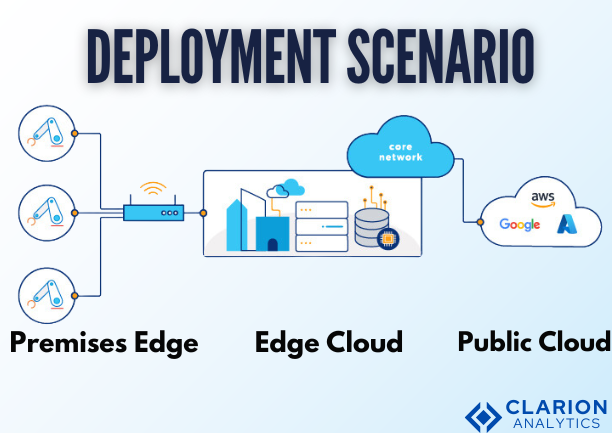
Edge Deployment: Imagine a pop-up event occurring right in the center of a busy city street. Edge deployment is about having your model close to the action, ideally on IoT devices, mobile phones, or local servers. It’s fast, it’s responsive, and perfect for real-time use, but it’s constrained by the local connectivity and hardware.
Section 2: Getting to Know RESTful APIs
2.1 What Makes RESTful APIs So Special?
RESTful APIs are similar to the backstage passes that allow your users to interact with your model without having to view all the wires and technology behind the scenes. But what are they?
RESTful APIs adhere to a set of principles that make them efficient, scalable, and simple to use. Fundamentally, they’re about simplicity—enabling various systems to talk to each other over the web in a manner that’s simple and stateless.
Here’s why RESTful APIs are so awesome:
Statelessness: Each time someone makes a request to your API, it’s a new conversation. Past requests aren’t stored on the server, keeping things nice and lightweight.
Client-Server Architecture: The client (which may be a web application, a mobile application, or even a different server) and the server (where your model resides) are two different things. They can grow independently, similar to two artists working on a project without treading on each other’s feet.
Uniform Interface: RESTful APIs are all about consistency. They employ standard methods (such as GET, POST, PUT, DELETE) to communicate with resources (such as your model), so it’s easy to understand and use.
But how do RESTful APIs compare to other APIs?
SOAP (Simple Object Access Protocol): SOAP can be likened to the overly formal, button-down way of doing APIs. It’s robust but lots and lots of rules and XML paperwork. REST is the laid-back, easy-going buddy who also gets the job done but without the fuss.
GraphQL: If REST is simplicity and simplicity, GraphQL is flexibility and accuracy. It allows clients to request precisely the data they require, nothing more, nothing less. This can be wonderful for complicated queries, but it also takes more configuration and diligent management.
2.2 The Building Blocks of RESTful APIs
Let’s get into the fundamental building blocks of RESTful APIs—imagine these as the key ingredients in a recipe for a successful rollout:
Resources: These are the central stars of your API—your deep learning model, data sets, or prediction outputs. Each resource has a distinct URI (Uniform Resource Identifier) that instructs the API where to locate it.
Methods: RESTful APIs communicate in a common tongue—HTTP methods. To retrieve data, you send GET. To create something new, POST. To update? That would be PUT. To delete? You got it, DELETE.
Status Codes: Each time you make a request to an API, it returns a status code—a fast thumbs up (200 OK), a nice “Nope” (404 Not Found), or a warning (500 Internal Server Error).
Responses: Last but not least, the API returns a response, typically JSON or XML. This is where your model’s results, predictions, or any other output is delivered back to the user.

Are you intrigued by the possibilities of AI? Let’s chat! We’d love to answer your questions and show you how AI can transform your industry. Contact Us
Section 3: Bringing It All Together—Integrating Deep Learning Models with RESTful APIs
3.1 Setting the Stage: Preparing Your Environment
Before you can release your model through a RESTful API, you must prepare the stage. This involves having your development environment in top shape, collecting the appropriate tools, and ensuring all systems are go for showtime.
What You’ll Need:
TensorFlow or PyTorch: These are the software programs you will utilize to create and train your deep learning model. They are like your model’s fitness program, keeping it in top condition.
Flask or Django: These Python web frameworks are the architects of your API. They assist you in planning the routes and endpoints that users will use to interact with your model.
Gunicorn: This is the bouncer that keeps your API server running smoothly, taking in multiple requests without even breaking a sweat.
Setting Up Your Environment:
Start by installing the necessary libraries. If you’re using Python, tools like pip or conda are your go-to for getting everything in place.
Set up a virtual environment. This is like having a dedicated workspace for your project, free from distractions and interference from other projects.
Configure your development environment—whether you’re using an IDE like PyCharm, VS Code, or a good old text editor, make sure everything is set up for seamless coding and testing.
3.2 Implementing the API: Building the Backend
With your design in hand, it’s time to get your sleeves rolled up and begin coding. This is where you bring your API to life, linking it to your model and opening it up to the world.
Writing the Server-Side Code:
Begin by setting up the skeleton of your API using Flask or Django. Define your routes and endpoints according to the design you’ve laid out.
Load your trained deep learning model. This is where you load your trained model into the API and it is prepared to make predictions instantly.
Process incoming requests—execute the data, send it to the model, and mold the predictions into a response.
Don’t forget to include error handling. This way, even when things fail, your API can recover gracefully and tell the user what went wrong.
Section 4: Making It Fast and Reliable—Optimizing Performance and Scalability
4.1 Supercharging Performance
Your API is running and live, but now it’s time to make it as efficient and fast as can be. Speed is important, particularly if your model must make real-time predictions or process a great deal of data.
Effective Model Loading and Inference:
Think about storing your model in a way that enables rapid loading, such as TensorFlow’s SavedModel or PyTorch’s TorchScript.
Utilize light data formats such as NumPy arrays or tensors to accelerate data processing.
Cache models or data that are used frequently to minimize loading times.
Batch Processing:
In case you expect large numbers of requests, batch processing can be a savior. Rather than processing each request separately, batch them. This can dramatically lower the time and resources needed for inference.
Hardware Acceleration:
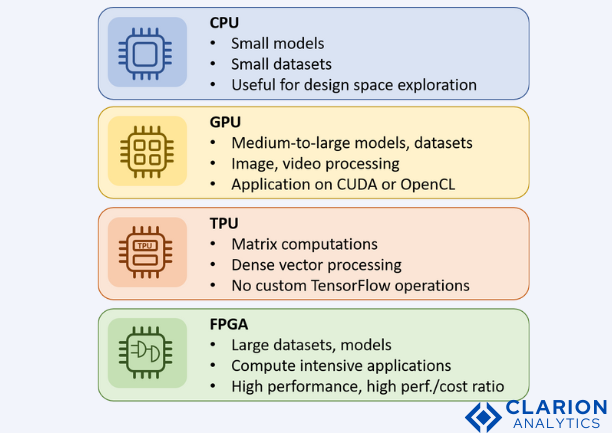
Use GPUs or TPUs to speed up your model’s computations. These dedicated processors are programmed to execute the high-intensity calculations of deep learning models.
Ensure the deployment environment supports these accelerators, be it in the cloud, on-premises, or at the edge.

4.2 Scaling for Success
As your API gains popularity, you’ll need to ensure it can handle the increased traffic without breaking down. Scalability is about preparing your API for the big leagues, ensuring it can grow alongside your user base.
Horizontal vs. Vertical Scaling:
Horizontal Scaling: Add more servers to distribute the load. This is like hiring more staff to handle a busy restaurant—it spreads out the work and keeps things running smoothly.
Vertical Scaling: Add more muscle to your current server with increased hardware power. This is analogous to moving into a larger, faster kitchen within the same restaurant.
Load Balancing:
Install load balancers to spread arriving traffic evenly between several servers. This keeps a single server from becoming overwhelmed and provides consistent results.
Containerization:
Use packages such as Docker to bundle your API and model together into a container. This simplifies deployment, makes it more portable, and more uniform across environments.
Think about using Kubernetes for container orchestration, which will automate scaling, load-balancing, and deployment.
Are you intrigued by the possibilities of AI? Let’s chat! We’d love to answer your questions and show you how AI can transform your industry. Contact Us
Section 5: Keeping It Safe—Security Considerations
5.1 Securing the API
Security is not an option when deploying deep learning models. Your API will be internet-facing, and thus a target for attacks. Your model, data, and users need to be protected.
Authentication and Authorization:
Use robust authentication mechanisms like OAuth or API keys to manage who has access to your API.
Utilize role-based access control (RBAC) so that users can only access the features they require.
Data Encryption:
Use SSL/TLS to encrypt data in transit so that no unauthorized person can get access to the data and even try to modify it.
Store sensitive data like user data or prediction outputs encrypted on the server before storing it.
5.2 Securing the Model
Your model is an asset, and it should be secured against theft or abuse.
Avoiding Model Extraction Attacks:
Limit the number of forecasts that can be generated within a certain time frame to minimize the risk of model extraction.
Utilize methods such as differential privacy to introduce noise into the model’s outputs so that it becomes more difficult for attackers to reverse-engineer the model.
Protecting Sensitive Information:
Establish strict access controls on any data consumed by your model so that it is accessible only to authorized users and systems.
Regularly audit your API’s security to identify and fix vulnerabilities.
Section 6: Staying on Top—Monitoring and Maintenance
6.1 Keeping an Eye on Performance
Once your API goes live, it’s crucial to keep an eye on its performance and make sure it’s up to your standards. That’s where monitoring tools prove useful.
Monitoring Usage and Metrics:
Implement tools such as Prometheus and Grafana to monitor important metrics like response times, request volumes, and error rates.
Keep a close eye on your API’s performance in real-time, and have alerts configured to notify you of problems, like slow response times or elevated error rates.
Utilizing Visualization Tools:
Prometheus: Prometheus is an open-source monitoring tool that enables you to gather and query metrics so that you can see your API’s performance.
Grafana: Use Grafana together with Prometheus to build custom dashboards and view your API’s performance over time. It’s as if you have a control room where you can view everything that’s going on with your API at a glance.
6.2 Updating and Maintaining Your Model
Your model’s journey doesn’t end with deployment. As time goes by, you’ll have to update your model to enhance its accuracy, introduce new features, or address shifting data.
Versioning Your API:
Use versioning to control updates without affecting current clients. This enables you to roll out new models or features incrementally, allowing users time to adjust.
Roll out updates in phases (A/B testing) to track performance and verify the new version is as expected.
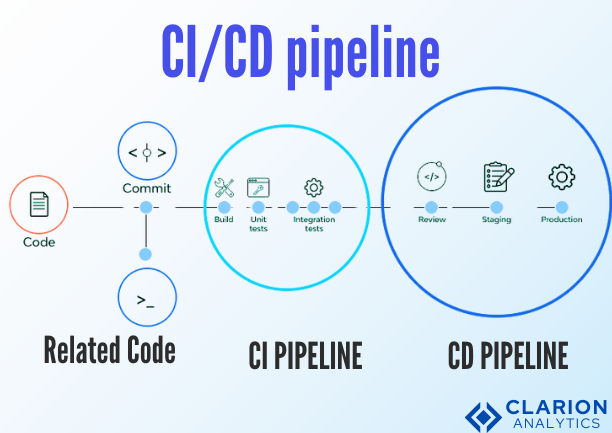
Automating Deployment with CI/CD:
Implement CI/CD pipelines to automate the deployment and testing of new models. This helps ensure that updates are deployed consistently and smoothly.
Utilize tools such as Jenkins, CircleCI, or GitLab CI to automate the deployment process, minimizing the risk of errors and downtime.

Conclusion
Deploying deep learning models is an exhilarating but daunting task. From the intricacies of deployment to performance optimization and security, there are so many things to take into consideration. RESTful APIs offer a robust means to expose your models to the world, making them scalable, accessible, and secure, and letting you share your work with the world.
Looking Ahead
The future of AI and model deployment is bright, with new trends like Explainable AI (XAI) and edge computing on the horizon. As these technologies evolve, so will the role of RESTful APIs in bringing AI to life.
Also Read:
Building reliable and scalable AI-powered applications requires a strong focus on security, quality, and efficient deployment, starting with Securing Deep Learning API: Best Practices and Challenges, which addresses the protection of AI services exposed through RESTful APIs. This is complemented by Node.js Security: Best Practices for a Robust Production Environment, ensuring backend stability, and MERN Stack Best Practices for Scalable and Efficient Development, which highlights architectures suited for high-performance applications. To streamline delivery, Ultimate MEAN Stack and Agile DevOps: Enhancing Deployment Efficiency emphasizes continuous integration and deployment, while Essential Code Quality Metrics for Software Success reinforces long-term maintainability. Bringing these elements together, Powerful Ways Generative AI is Reshaping the Future of Industries illustrates how secure, well-architected RESTful APIs enable AI solutions to drive real-world impact across sectors.
Are you intrigued by the possibilities of AI? Let’s chat! We’d love to answer your questions and show you how AI can transform your industry. Contact Us
